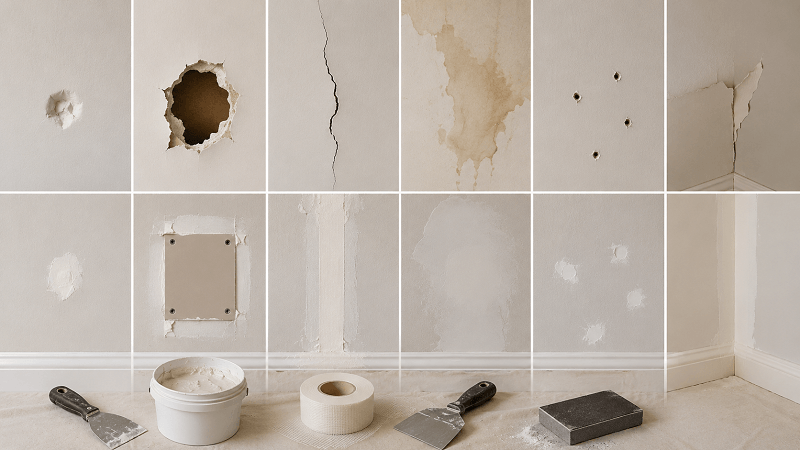
Drywall damage comes in many forms, and they do not all need the same repair approach. A small doorknob hole gets handled differently than a four-foot hole from accidental damage. A water-stained ceiling needs different treatment than a crack from settling. Understanding the different categories helps homeowners describe their needs accurately when getting quotes and recognize the right repair approach when a contractor proposes one.
Specialist drywall hole repair Toronto contractors handle the full range of damage types and know which approach fits each situation. The right repair, executed properly, leaves the wall or ceiling looking as if the damage never happened. The wrong approach leaves visible patches that bother you every time you walk past.
Why this matters more than people think
Drywall repair is among the most common home repair needs Canadians address. Renovation and repair services in Canada represent over $105 billion in annual nominal spending, supporting over half a million jobs, with drywall repair representing a steady and substantial portion. The quality range across providers is wide, which makes understanding what good work looks like worthwhile.
Small holes (less than 2 inches)
Picture hangers, doorknob impacts, accidental punctures, and similar small damage. These are the most common drywall repairs and the most forgiving.
Proper repair: clean the damaged area, apply mesh tape or a small drywall patch with adhesive backing, apply joint compound in thin coats with feathering at the edges, sand smooth, prime, and paint to match. The repair should be invisible under any lighting once paint dries.
Common mistakes: applying compound too thick, not feathering edges, skipping primer, or rushing the work before compound is fully dry. Each leaves visible evidence of the repair.
Medium holes (2 to 6 inches)
Door knob impact that goes all the way through, accidental kicks, removed wall fixtures that leave openings, plumbing or electrical work that requires access.
Proper repair: the existing damage is squared off into a clean rectangle. A patch piece of drywall is cut to fit and installed with backing strips behind it for stability. Joint tape and compound integrate the patch into the surrounding wall. Multiple coats of compound, sanded between, create a smooth surface. Prime and paint to match.
This is where DIY attempts often go wrong. Cutting clean openings, installing backing properly, and feathering the patch invisibly require techniques that take practice to do well.
Large holes (over 6 inches)
Major accidental damage, removal of significant fixtures, plumbing work that requires substantial access, or damage from impacts that breaks larger sections of drywall.
Proper repair: cut the damaged area back to the nearest framing members on each side, install a new piece of drywall secured to the framing with proper fasteners, tape and finish the seams with multiple coats of compound, sand, prime, and paint.
Large patches need to integrate with the surrounding drywall texture and color. Lighting reveals imperfections that may not be visible during the work. Good contractors check work under multiple lighting conditions before considering it complete.
Cracks
Drywall cracks come from several causes: house settling, framing movement with temperature and humidity changes, vibration, or poor original installation. The cause affects the repair approach.
Settlement cracks. The house has shifted, opening a crack. If the settlement has stabilized, the crack can be repaired permanently. Active settlement requires structural attention before cosmetic repair makes sense.
Stress cracks. Common at corners of door and window openings, where wood framing moves with humidity. These tend to reopen if just patched cosmetically. Proper repair uses flexible materials and proper technique to accommodate ongoing movement.
Tape failure cracks. Sometimes the joint tape between drywall sheets fails or was poorly installed originally. The crack follows the joint line. Proper repair removes the failing tape, retapes the joint, and refinishes.
Each crack type benefits from understanding the cause and matching the repair to the underlying condition.
Water damage
Water-damaged drywall presents different challenges than physical damage. Issues include:
- Visible staining. Even after the area is dry, water leaves stains that bleed through standard paint.
- Structural compromise. Water often weakens drywall to where it sags or crumbles, requiring replacement rather than patching.
- Mold potential. Water-damaged drywall can harbor mold, especially if it remained wet for any extended period. Hidden mold creates health concerns and requires proper remediation.
- Underlying issues. The water came from somewhere. Repairing the visible damage without addressing the source guarantees the problem returns.
Proper repair: identify and fix the water source first; remove all damaged material (not just the visible stain area); allow proper drying time for surrounding materials; test for mold if conditions warrant; replace damaged drywall; use stain-blocking primer before paint to prevent bleed-through; finish with appropriate paint.
Popped nails and screw pops
Drywall fasteners can work loose over time, creating small bumps where the nail or screw head pushes against the drywall surface. The cause is usually framing movement or improper original installation.
Proper repair: reset the offending fastener (sometimes adding a new fastener nearby for security), patch over the head with compound in thin coats, sand smooth, prime and paint.
Pot light and recessed fixture cutouts
Existing pot light cutouts often need cleanup when the fixture is removed or changed. Aria vents, return air grilles, and other ceiling penetrations sometimes need patching when functions change.
Proper repair for closing these openings: install a backing piece behind the opening, cut a drywall patch to fit, install with proper fasteners, tape and finish to match the surrounding ceiling. Texture matching matters if the ceiling has texture.
Choosing the right repair approach
Good contractors recommend approaches that match the specific damage rather than applying a one-size-fits-all method. The conversation during quoting reveals contractor quality: do they look at the damage carefully, ask about how it happened, and propose specific approaches for specific situations? Or do they propose generic patching regardless of what they are looking at?
The right repair for the specific damage produces results that hold up over time. The wrong approach produces repairs that show, fail, or both. The cost difference between right and wrong approaches is usually small. The result difference is large.